TWO FACED TECHNOLOGY - IN THE MAKING
Plenty of hard work , blood, sweat and effort was put into creating the final project. As a psychology student, I had no experience in photo shop before this. Thus, I hope this artwork can meet the expectations and won't disappoint.
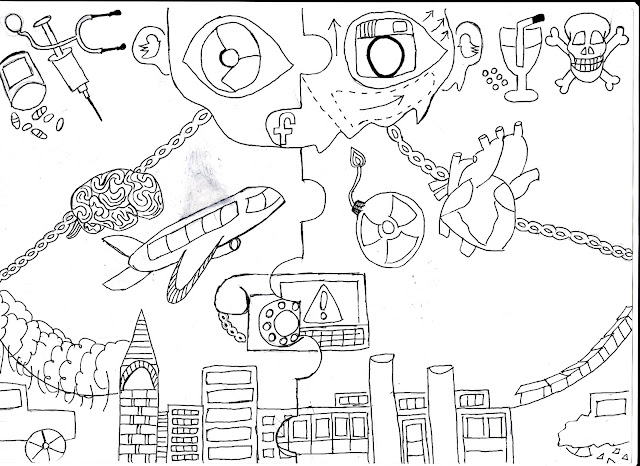
Original Sketch
Step 1 : I did a abstract art for the background to make the artwork more original.
Tool used - Brush > Colour > Opacity > Eraser

Step 2 : The abstract art I did was inverted to the opposite colour to create a contrast.
Tools used : Linear light > Opacity
Step 3 : Both layers were duplicated on top of the original sketch layer and multiply was selected.
Tools used : Multiply > Opacity
Step 4 : Once the sketch looked visible, I used the eraser tool to clean the objects and details in the sketch. This is to make the colouring process easier later on.
Tools used: Eraser ( Brush and Block)

Tools used : Brush ( all types) > Bush Brushes ( downloaded online) > Opacity


Step 6: Later on, I felt that the icons on my sketch are not outstanding enough. I decided to create my own using photoshop.
Tools used : Rounded Rectangular tool > Elliptical Marquee tool > Polygonal Lasso tool > Lasso tool > Magic Wand tool > Pain Bucket tool


Step 7 : Then, I duplicated all the icon layers on the main layer and adjust the size of the image. The extra white backgrounds were all removed.
Tools used : Polygonal Lasso tool > Lasso tool > Eraser

Step 8 : Spent plenty of time adjusting the opacity for every objects, making the final product more clear, recoloured some items and outlined some of the original sketches. I realized it was too dull and flat looking. Therefore, I proceeded to find textures to add into the artwork to make it look more striking and 3 dimensional.
Tools used : Eraser > Brush > Lasso Tool > Stroke ( Edit) > Opacity

Step 9 : Finally found suitable textures to make the artwork pop. Played around with the opacity to suit the mood of the artwork.
Tools used : Duplicate layers > Eraser > Opacity > Effects

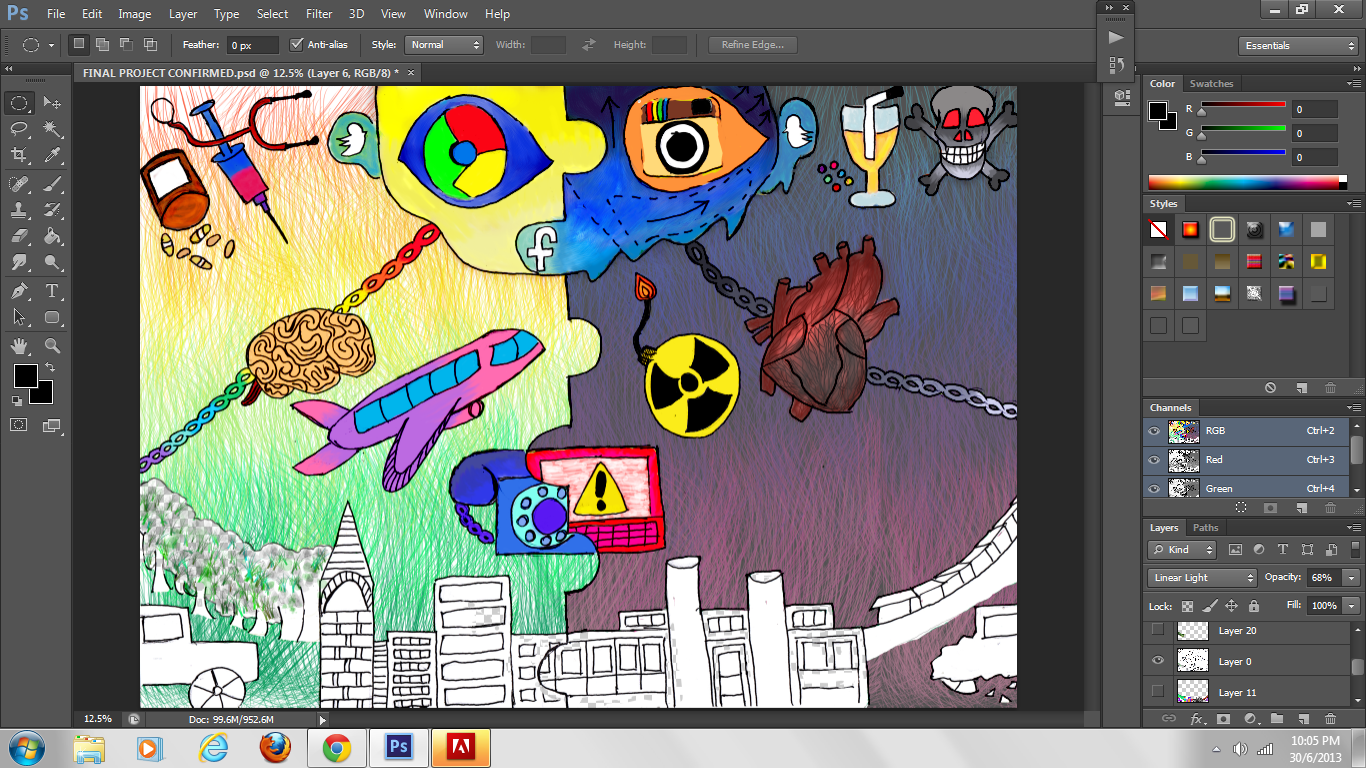
TADAAAAAA! THE END PRODUCT.
* Claps*
Lots of Love, A dose of Joey
References for textures:
http://thumbs.dreamstime.com/thumblarge_161/11833813597FbAih.jpg
http://www.123rf.com/photo_5416922_human-tissue-or-veins-on-a-bright-red-background.html
http://t3.gstatic.com/images?q=tbn:ANd9GcQPpH7k6FY00ysP3jOjZ58p2IqvM6xylDu_9Kvc4Gjsi_5Y5uz4
http://image.naldzgraphics.net/2012/10/24-red-yellow-shiny-glitter-hi-resolution-texture.jpg
http://cdnm.tutorialchip.com/wp-content/uploads/2012/11/Gold-Glitter-Texture-520x348.jpg
http://imgs.mi9.com/uploads/abstract/3850/sparkling-and-romantic-backgrounds-hk023-350a_1920x1200_59285.jpg
No comments:
Post a Comment